- Time of past OR future Camino
- First one in 2005 from Moissac, France.
Hi all - hiking trailers are mentioned here and there so thought I would put a post up with some info and some pics and also details of the one I made.
The American military conducted a series of tests on moving soldiers and their heavy packs. Rear packs, front and rear packs, trailers. They found that using a trailer used 80% less energy expenditure - 80%!! - but, for some weird reason they pushed their trailers instead of having them attached to a hip belt and pulled along behind.
First off - no, they never get stuck or bogged down, they bounce over all terrain, are easy to maneuvre, aren't a problem at refugios nor on public transport. It is difficult to explain how easy it is to use a trailer, it is one of those "you must try it to know" situations. The absolute joy of having no weight on the back - and no sweaty back! - walking upright and casually and the trailer just coming on behind with seemingly no effort at all. True, one cannot beat the laws of physics and going up a steep hill one can feel the trailer, but at a tiny fraction of what it is like to do that hill wearing a pack. Compare it to this .. carrying a loaded bicycle and wheeling one along - the difference is similar.
Also, they are safe. There is a big 'click to release' buckle on the hip belt - one click and one is separated from it. Though really, if it became ungainly on a truly steep descent all one would have to do is to sit down!!
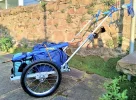
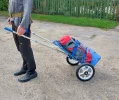
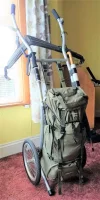
Currently I use the Wheelie, from Radical Design. They offered it to me at one quarter price when they found out that I do first aid on Camino and need to carry a lot of supplies. Originally I declined as I didn't believe that I deserved it, but they pointed out that they would get good advertising from me having one, so I agreed. It is a great trailer, beautifully engineered and made and will last a lifetime, definitely mine, I'm 70 - but I found the bag that comes with it awkward and cumbersome. It has one big front and one big rear storage space so anything small you put in disappears down to the bottom! Also, it is not easily removable, one has to take the frame apart! and, it does not have all the outer small pockets we are used to on Camino. This means that one has to dig around and remove bags of things to go upstairs in a refugio - a real pain. So I removed the bag and chose a rectangular tube shaped rucksack, the UK made Yellowstone - fab pack - and with the addition of some webbing belts made it so that it is easily fitted securely to the frame but removes in seconds. I also changed the hip belt for a lighter one and made new webbing connectors.
This is how I have it now - though I do also have a smaller removable first aid 'reaction bag' that I drop down over the handles (and a big first aid sign and a small solar panel).
First pic is as it came, with the addition of tubes for a walking pole and umbrella/sun parasol and the second with my pack adaptation. As you can see, I am not a young fit person!!
Note bicycle bell!! (and re footwear questions elsewhere - I always walk in those Keen Newport trekking sandals!!!).
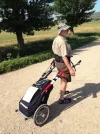
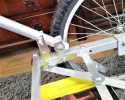
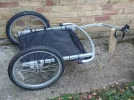
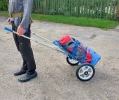
Now, I also made a trailer for my Aussie Camino pal, Jenny. I used a small cycle trailer as the base. I removed the connecting to the bike pole, then added metal corner plates at the front to reinforce the box. I then used aluminium poles - caravan awning poles - on the sides. The first connection to the box is a swivel bolt so that the first length of pole simply swivels back out of the way. Each side the aluminium is in two sections with simple bolt and wingnut fastening (weirdly, none of the bolts ever work loose!!). At the end of each of these drawbars I attached copper plumbing pipe. Copper as it is easy to bend with a pipe bender whereas aluminium snaps if you try to bend it, and these tubes slide into the aluminium tubes and are also fixed but adjustable. Now, as the box and the therefore the load is directly over the axle the box has to be level and this is made a simple adjustment by just pulling the copper tubes further out or pushing them in as this raises and lowers the final horizontal section.
The poles have webbing straps with a clip and this is simply clipped to a padded hip belt. I also added a bicycle bell!! The hand grips are actually grips for metal detectors. I fitted four small d rings for attaching bungey cords (shock cords) across the top and a standard 50 litres rucksack cover fits well as the weather cover.
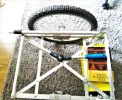
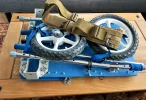
Here the pics - apologies for poor quality. Later I added a removable crossbar to the drawbars to give rigidity, shown in one photo.
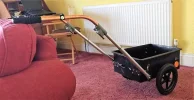
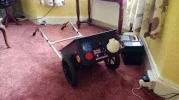
and folded up with all the bits packed away into the box - I added a handle! - for transporting.
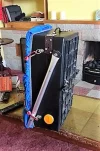
Now, if you decide to make your own this is the main, the principal thing! One HAS to start from here - the load has to be directly over the axle.
The Americans commonly use a single wheel straight board trailer that clips to a waist belt but this is an awful design! First, that single wheel makes it inherently unstable and, secondly, half the trailer and load weight is on the hip belt - you might as well wear a rucksack. The whole thing with a hiking trailer, which was obvious to me - and is why I made the one for Jenny - is that the load has to be balanced over the two wheel axle, nowhere else. When it is balanced thus there is no weight on the body, it is like it isn't there.
I have now bought another cycle trailer as there is an idea that I would like to try out. It seems to me that there may be no need for the long handles, that one could connect the trailer with a simple swivel mount bolted to the rear of the hip belt and then one could be completely hands free - now that I have the new cycle trailer I will be working on that design soon!!
Jenny is coming over to the uk in June and she and I, with our trailers, will be walking from Pamplona, about the 20th is best guess - if you see us stop us and try one or both of them out!!
Any questions, any at all, please do ask!
The American military conducted a series of tests on moving soldiers and their heavy packs. Rear packs, front and rear packs, trailers. They found that using a trailer used 80% less energy expenditure - 80%!! - but, for some weird reason they pushed their trailers instead of having them attached to a hip belt and pulled along behind.
First off - no, they never get stuck or bogged down, they bounce over all terrain, are easy to maneuvre, aren't a problem at refugios nor on public transport. It is difficult to explain how easy it is to use a trailer, it is one of those "you must try it to know" situations. The absolute joy of having no weight on the back - and no sweaty back! - walking upright and casually and the trailer just coming on behind with seemingly no effort at all. True, one cannot beat the laws of physics and going up a steep hill one can feel the trailer, but at a tiny fraction of what it is like to do that hill wearing a pack. Compare it to this .. carrying a loaded bicycle and wheeling one along - the difference is similar.
Also, they are safe. There is a big 'click to release' buckle on the hip belt - one click and one is separated from it. Though really, if it became ungainly on a truly steep descent all one would have to do is to sit down!!
Currently I use the Wheelie, from Radical Design. They offered it to me at one quarter price when they found out that I do first aid on Camino and need to carry a lot of supplies. Originally I declined as I didn't believe that I deserved it, but they pointed out that they would get good advertising from me having one, so I agreed. It is a great trailer, beautifully engineered and made and will last a lifetime, definitely mine, I'm 70
This is how I have it now - though I do also have a smaller removable first aid 'reaction bag' that I drop down over the handles (and a big first aid sign and a small solar panel).
First pic is as it came, with the addition of tubes for a walking pole and umbrella/sun parasol and the second with my pack adaptation. As you can see, I am not a young fit person!!
Note bicycle bell!! (and re footwear questions elsewhere - I always walk in those Keen Newport trekking sandals!!!).


Now, I also made a trailer for my Aussie Camino pal, Jenny. I used a small cycle trailer as the base. I removed the connecting to the bike pole, then added metal corner plates at the front to reinforce the box. I then used aluminium poles - caravan awning poles - on the sides. The first connection to the box is a swivel bolt so that the first length of pole simply swivels back out of the way. Each side the aluminium is in two sections with simple bolt and wingnut fastening (weirdly, none of the bolts ever work loose!!). At the end of each of these drawbars I attached copper plumbing pipe. Copper as it is easy to bend with a pipe bender whereas aluminium snaps if you try to bend it, and these tubes slide into the aluminium tubes and are also fixed but adjustable. Now, as the box and the therefore the load is directly over the axle the box has to be level and this is made a simple adjustment by just pulling the copper tubes further out or pushing them in as this raises and lowers the final horizontal section.
The poles have webbing straps with a clip and this is simply clipped to a padded hip belt. I also added a bicycle bell!! The hand grips are actually grips for metal detectors. I fitted four small d rings for attaching bungey cords (shock cords) across the top and a standard 50 litres rucksack cover fits well as the weather cover.
Here the pics - apologies for poor quality. Later I added a removable crossbar to the drawbars to give rigidity, shown in one photo.


and folded up with all the bits packed away into the box - I added a handle! - for transporting.

Now, if you decide to make your own this is the main, the principal thing! One HAS to start from here - the load has to be directly over the axle.
The Americans commonly use a single wheel straight board trailer that clips to a waist belt but this is an awful design! First, that single wheel makes it inherently unstable and, secondly, half the trailer and load weight is on the hip belt - you might as well wear a rucksack. The whole thing with a hiking trailer, which was obvious to me - and is why I made the one for Jenny - is that the load has to be balanced over the two wheel axle, nowhere else. When it is balanced thus there is no weight on the body, it is like it isn't there.
I have now bought another cycle trailer as there is an idea that I would like to try out. It seems to me that there may be no need for the long handles, that one could connect the trailer with a simple swivel mount bolted to the rear of the hip belt and then one could be completely hands free - now that I have the new cycle trailer I will be working on that design soon!!
Jenny is coming over to the uk in June and she and I, with our trailers, will be walking from Pamplona, about the 20th is best guess - if you see us stop us and try one or both of them out!!
Any questions, any at all, please do ask!
Last edited:


