• Remove ads on the forum by becoming a donating member. More here.

Search 74,075 Camino Questions

Ferrino Trekker Improvements

L Squared

Member
Time of past OR future Camino
Camino Portugues (2021)
Camino Frances (April 17, - May, 15, 2015)
I purchased Ferrino Trekker rain gear knowing it would not be perfect for the Camino, but prepared to make modifications tailored to the needs of the Camino. I was considering the Altus, Trekker, Packa and the Sea to Summit Sil-Nylon poncho. Originally I was going to pick up an Altus when I got to Spain but then decided I wanted to actually have it before I arrived in Spain so that I could test it out and get familiar with it. The Trekker, Packa and Sea to Summit were available to order easily from the USA. After a little more research I decided the Sea to Summit being a true poncho was not what I wanted. The Packa was really appealing, and I thought about getting it and adding some length to it. But thought since it was already so expensive it seemed kind of silly to make changes to it. So I settled on the Ferrino Trekker. The problems with the Trekker seemed like something that I would be able to modify without much cost and without changing the overall look and function other to improve it. So I purchased the Ferrino Trekker from Amazon. It arrived in 3 days and I got started on the modifications.

I had been reading a thread on the Camino de Santiago Forum on “Italian brand poncho, starts with F ... anyone know the brand??” and got to a posting by t2andreo which described the “perfect” rain-gear. It seemed the Trekker included many of the features but was missing out on armpit zippers and a two way zipper for the front closure. It also seemed that good torso ventilation was required for the “perfect” rain-gear and after seeing the Trekker it seemed the ventilation at the front torso could be improved. I also thought the wrists closure should be capable of being totally open or else cinched tight during a downpour. The Trekker had elastic around the wrists as well as Velcro to cinch them tight. But in the open condition they weren't as open as they could be if the elastic was removed. So an additional improvement was to insert an elastic cord with a small clamp so that it could be cinched tight or be totally loose and open at the bottom of the sleeves.

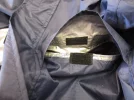
I started with the torso ventilation and wrist ventilation first. The torso vents on either side of the chest are ~8” long on each side but the middle 1/3 was sewed closed leaving just two small vents on each side of the chest. I removed the stitching closing the middle 1/3 of each vent and instead sewed in a 1 1/2 inch piece of Velcro. This would allow me to close the vent or else totally open the vent. This is a very easy modification if you have a sewing machine and some Velcro. Also now each vent can be opened and you can put your hand through the vent to access shirt pockets. Seems like a win-win solution.

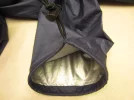
Next I opened up the sleeve casing on each sleeve and removed the ½” wide flat elastic. Next sewed two button holes in the casing so that I could thread round elastic through the casing. I threaded the elastic through the casing and out the buttonholes and through a small plastic clamp and tied the ends together. Finally I sewed up the casing where I had removed the stitching to access the flat elastic Now they are totally adjustable. You can open them up for lower arm ventilation. Later I decided the Velcro and adjustable flap was just not needed to I unstitched the flap and the Velcro. I saved the Velcro and used it on the front flap that covers the zipper, which I will discuss below.

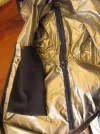
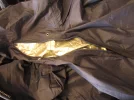
Next I tackled the underarm zips. I unstitched from the armpit 8 inches down the arm and from the armpit to 8” down the side torso. I inserted two 8” zippers with the opening both at the arm pit. Wow lots of ventilation now. For the torso zipper I created a wind flap the cover the zipper. I didn't do this for the one under the arm because the arm covers up the zipper unless you are flapping your arms around. This really opens up a lot of ventilation. Maybe too much ventilation, not sure at this time. So under the other arm I just inserted one pit zipper from the pit down the arm. I’ll test it out and see what I like best.

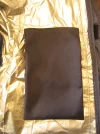
Additional collaboration with t2andreo “Tom” and map pockets on the inside of the jacket that were accessible from outside the Trekker were added to the wish list. The map pockets are on the inside of the Trekker that hang just below the two chest vents. To make these I cut out two strips of nylon fabric 8” wide by 20” long. Using a candle I seared the raw edge on all four sides. I hemmed the two 8” sides by folding over ½ inch and sewing. Then I folded the strip of nylon in half sewed the 9 ½ inch sides of the pocket with a ¼” seam and turned it inside out so the stitching is all inside the pocket. At this point you should have two pockets 7 ½” wide by 9 ½” long. I sewed each pocket to the lower flap of the torso vent. Now to access this pocket you can just pull the Velcro apart in the torso vent and put your hand inside the vent into the pocket. I used non waterproof nylon fabric since it is on the inside of the jacket protected from rain. These will be really handy for holding papers, maps and other small lightweight items.

The last item on the list was to replace the front closure one was zipper with a two way zipper so that the Trekker could be opened on the bottom and closed on the top. I could not locate an appropriate zipper locally but did find one on line. The front closure is redundant with both a zipper and Velcro sealing the wind flap approximately every 8”. Since I didn’t have the correct zipper I just decided to just add more Velcro with additional pieces sewn between every 8” piece that was originally in the Trekker so that I have Velcro every 4” instead of every 8”. This is where I used the Velcro that I removed from the wrists of the Trekker. That way if I want it open at the bottom I can just use the Velcro to seal the upper opening with double the sealing points. I’ll give this a try and if it is OK then just live with the one way zipper.

I tested out the Trekker in a rainstorm. And it is still far from perfect. I did get moisture inside the Trekker from sweating, not from the rain. Mostly in the region of my upper back and I was not wearing my pack so I anticipate this will be a soggy area while walking. I like the pit zips and to be able to open the wrists up completely. Arms and front torso remained dry. The pockets were handy. I tested them out with a MP3 player house keys and phone and they are a great addition to the Trekker.

If you have a sewing machine and basic sewing skills you can give these improvements a try. Thanks to Tom for his great advice on this collaboration.

Check out my other Camino gear sewing project and make yourself a down sleep blanket.
https://www.caminodesantiago.me/com...e-down-blanket-from-recycled-materials.29640/

Laura
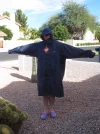
Trekker Before 1.webp Pit Zips 1.webp Trekker Sleeve Rev.webp Trekker Pocket.webp Trekker Vent .webp Pit Zips & Pockets.webp

(FYI - my daughter wearing my small/med Trekker is 5" 8" tall.)
 
Last edited:
...and ship it to Santiago for storage. You pick it up once in Santiago. Service offered by Casa Ivar (we use DHL for transportation).
Now, if you could find someone to manufacture your, now unique design in sil-nylon and bright road safety colors, with reflector strips, this might be THE killer raingear for the Camino.

Oh, I have one more improvement. Make the coat resizable by figuring out how to fold the lower 12 - 15 inches up under the torso, like an old-fashioned "cagoule." This would allow the trekking raincoat to be worn as a shorter parka in town, or when it was only raining lightly. When needed, fold down the lower bit, and have protection to your knees.

Great job!
 
Holoholo automatically captures your footpaths, places, photos, and journals.
Tom,
I think you could put snaps on the bottom edge of the jacket at the front, side seams and center back similar to what are used in the upper back to gather up the excess fabric needed to accommodate the pack. The Macabi skirt that many of the ladies wear have a similar scheme using snaps that allow you to shorten the skirt by just snapping it up.

If I ever wear out my Trekker then I'll take it apart and use it as a pattern to make the ultimate raingear using bright colored sil-nylon fabric. I'd like to ultimately incorporate a back vent of some sort as I feel now that is the only place inadequately vented in my modified Trekker. I'm kind of thinking of exploring the back venting design used on Columbia's Tamiami line of shirts. The entire upper back is a large vent.

This was a fun project that kept evolving. Tom, I appreciate your good design feedback. I'm especially pleased with the addition of the torso vent pockets! :D
 
Laura, did you do anything about sealing the seams where you did sewing modifications?
 
No I didn't because most of the places I was sewing were either protected like the inside of the torso vent, or the wrists were over existing stitching and the front zipper rain flap which is in a redundantly protected area. The only place I may have problems are with the pit zips. The one zipper on the torso I have protected with a rain flap so I think that should be OK. The only problem areas are the pit zips down the arms. I'm hoping that since these are on the underside of my arms they won't leak. Also the zipper is cloth and water can wick in there but then again I'm counting on this area not getting wet since it is under my arm. I could add a rain flap I suppose but it just seems like extra bulk under the arm. So I guess for now I'm just going to go with it.

I think ideally instead of putting two pit zippers under each arm I would get one about 12' long and have the opening at the torso about 3-4 inches from the center of the pit and then have the end of the zipper down the arm. then I think I would put a rain flap over this so that the opening of the flap was toward my rear. So if you were walking into a fierce wind with rain you would be protected. If I ever start from scratch to make a Trekker like rain coat, I would do it this way.
 
3rd Edition. More content, training & pack guides avoid common mistakes, bed bugs etc
Tom,
I think you could put snaps on the bottom edge of the jacket at the front, side seams and center back similar to what are used in the upper back to gather up the excess fabric needed to accommodate the pack. The Macabi skirt that many of the ladies wear have a similar scheme using snaps that allow you to shorten the skirt by just snapping it up.

If I ever wear out my Trekker then I'll take it apart and use it as a pattern to make the ultimate raingear using bright colored sil-nylon fabric. I'd like to ultimately incorporate a back vent of some sort as I feel now that is the only place inadequately vented in my modified Trekker. I'm kind of thinking of exploring the back venting design used on Columbia's Tamiami line of shirts. The entire upper back is a large vent.

This was a fun project that kept evolving. Tom, I appreciate your good design feedback. I'm especially pleased with the addition of the torso vent pockets! :D

You might consider a center, back-vent in the lower portion that works like a range-riding raincoat, once popular among cowboys, both in the US and in Australia. I am referring to the lower 12 - 15 inches that would fold up and under the upper portion to be stored to create a parka as previously mentioned. In the old days, these coats were made of a lightweight, waxed cotton fabric with no liner. Today, they can be seen and purchased in tack stores that sell western wear. You can even find them online.

They were worn as a "duster" to cover one's other clothing in hot, dry, dusty and windy weather, or as an outer garment on cool, rainy and snowy days. Frequently, they were long and came down to the top of cowboy boots - mid calf or so. The high back-split was to accommodate the saddle, to be able to get on and off a horse, and to be able to access one's sidearm easier.

However, I suspect it might also work while walking, depending on how long the coat hem actually is. The split panel down the main rear seam works to split the coat. However, a suitable lightweight zip might also do the trick.

We are getting there. This thing is going to be expensive when perfected. On the other hand, it will be perfect, won't it?

Keep up the good work. I will continue thinking of improvement ideas...


Tom,
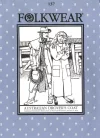
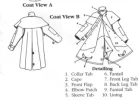
I just bought a pattern about a month ago, made by Folkwear called the Australian Drover's Coat. This is the style coat that you are describing in your post. The split up the back has a piece inserted called the "fantail" which allows it to cover the rider real while sitting on the horse and keep the rider and saddle dry. I was Googling to find pictures of the pattern and stumbled upon a lightweight backpacking forum where one of the guys has the same Australian Drover Coat pattern and was proposing making the Drover coat out of Cuban fiber cloth and using it as a dual purpose rain coat / tee pee style tent. Here is a link to his comment, although you will have to scroll down the first page a ways.
http://www.backpackinglight.com/cgi...display.html?forum_thread_id=19247&startat=20

FW137-front.webp FW137 Back 1.webp

The little cape on the Drovers Coat might allow for a location to insert an upper back vent. This coat would also be great if you were doing the camino by bicycle. May need to take a look at Cuban fiber if it is a significant weight advantage of Sil-nylon.
 
I purchased Ferrino Trekker rain gear knowing it would not be perfect for the Camino, but prepared to make modifications tailored to the needs of the Camino. I was considering the Altus, Trekker, Packa and the Sea to Summit Sil-Nylon poncho. Originally I was going to pick up an Altus when I got to Spain but then decided I wanted to actually have it before I arrived in Spain so that I could test it out and get familiar with it. The Trekker, Packa and Sea to Summit were available to order easily from the USA. After a little more research I decided the Sea to Summit being a true poncho was not what I wanted. The Packa was really appealing, and I thought about getting it and adding some length to it. But thought since it was already so expensive it seemed kind of silly to make changes to it. So I settled on the Ferrino Trekker. The problems with the Trekker seemed like something that I would be able to modify without much cost and without changing the overall look and function other to improve it. So I purchased the Ferrino Trekker from Amazon. It arrived in 3 days and I got started on the modifications.

I had been reading a thread on the Camino de Santiago Forum on “Italian brand poncho, starts with F ... anyone know the brand??” and got to a posting by t2andreo which described the “perfect” rain-gear. It seemed the Trekker included many of the features but was missing out on armpit zippers and a two way zipper for the front closure. It also seemed that good torso ventilation was required for the “perfect” rain-gear and after seeing the Trekker it seemed the ventilation at the front torso could be improved. I also thought the wrists closure should be capable of being totally open or else cinched tight during a downpour. The Trekker had elastic around the wrists as well as Velcro to cinch them tight. But in the open condition they weren't as open as they could be if the elastic was removed. So an additional improvement was to insert an elastic cord with a small clamp so that it could be cinched tight or be totally loose and open at the bottom of the sleeves.

I started with the torso ventilation and wrist ventilation first. The torso vents on either side of the chest are ~8” long on each side but the middle 1/3 was sewed closed leaving just two small vents on each side of the chest. I removed the stitching closing the middle 1/3 of each vent and instead sewed in a 1 1/2 inch piece of Velcro. This would allow me to close the vent or else totally open the vent. This is a very easy modification if you have a sewing machine and some Velcro. Also now each vent can be opened and you can put your hand through the vent to access shirt pockets. Seems like a win-win solution.

Next I opened up the sleeve casing on each sleeve and removed the ½” wide flat elastic. Next sewed two button holes in the casing so that I could thread round elastic through the casing. I threaded the elastic through the casing and out the buttonholes and through a small plastic clamp and tied the ends together. Finally I sewed up the casing where I had removed the stitching to access the flat elastic Now they are totally adjustable. You can open them up for lower arm ventilation. Later I decided the Velcro and adjustable flap was just not needed to I unstitched the flap and the Velcro. I saved the Velcro and used it on the front flap that covers the zipper, which I will discuss below.

Next I tackled the underarm zips. I unstitched from the armpit 8 inches down the arm and from the armpit to 8” down the side torso. I inserted two 8” zippers with the opening both at the arm pit. Wow lots of ventilation now. For the torso zipper I created a wind flap the cover the zipper. I didn't do this for the one under the arm because the arm covers up the zipper unless you are flapping your arms around. This really opens up a lot of ventilation. Maybe too much ventilation, not sure at this time. So under the other arm I just inserted one pit zipper from the pit down the arm. I’ll test it out and see what I like best.

Additional collaboration with t2andreo “Tom” and map pockets on the inside of the jacket that were accessible from outside the Trekker were added to the wish list. The map pockets are on the inside of the Trekker that hang just below the two chest vents. To make these I cut out two strips of nylon fabric 8” wide by 20” long. Using a candle I seared the raw edge on all four sides. I hemmed the two 8” sides by folding over ½ inch and sewing. Then I folded the strip of nylon in half sewed the 9 ½ inch sides of the pocket with a ¼” seam and turned it inside out so the stitching is all inside the pocket. At this point you should have two pockets 7 ½” wide by 9 ½” long. I sewed each pocket to the lower flap of the torso vent. Now to access this pocket you can just pull the Velcro apart in the torso vent and put your hand inside the vent into the pocket. I used non waterproof nylon fabric since it is on the inside of the jacket protected from rain. These will be really handy for holding papers, maps and other small lightweight items.

The last item on the list was to replace the front closure one was zipper with a two way zipper so that the Trekker could be opened on the bottom and closed on the top. I could not locate an appropriate zipper locally but did find one on line. The front closure is redundant with both a zipper and Velcro sealing the wind flap approximately every 8”. Since I didn’t have the correct zipper I just decided to just add more Velcro with additional pieces sewn between every 8” piece that was originally in the Trekker so that I have Velcro every 4” instead of every 8”. This is where I used the Velcro that I removed from the wrists of the Trekker. That way if I want it open at the bottom I can just use the Velcro to seal the upper opening with double the sealing points. I’ll give this a try and if it is OK then just live with the one way zipper.

I tested out the Trekker in a rainstorm. And it is still far from perfect. I did get moisture inside the Trekker from sweating, not from the rain. Mostly in the region of my upper back and I was not wearing my pack so I anticipate this will be a soggy area while walking. I like the pit zips and to be able to open the wrists up completely. Arms and front torso remained dry. The pockets were handy. I tested them out with a MP3 player house keys and phone and they are a great addition to the Trekker.

If you have a sewing machine and basic sewing skills you can give these improvements a try. Thanks to Tom for his great advice on this collaboration.

Check out my other Camino gear sewing project and make yourself a down sleep blanket.
https://www.caminodesantiago.me/com...e-down-blanket-from-recycled-materials.29640/

Laura
View attachment 15797 View attachment 15798 View attachment 15799 View attachment 15800 View attachment 15801 View attachment 15803

An additional modification to consider; apply reflective strips along the lower hem and vertically along the front, sides, and back to provide additional visibility in dark rainy and dangerous conditions. Simple iron-on strips are easy to apply and weigh practically nothing.
 
3rd Edition. More content, training & pack guides avoid common mistakes, bed bugs etc
An additional modification to consider; apply reflective strips along the lower hem and vertically along the front, sides, and back to provide additional visibility in dark rainy and dangerous conditions. Simple iron-on strips are easy to apply and weigh practically nothing.

That is a good idea boots 682, but you wouldn't want to use iron-on on a nylon Trekker, Altus or poncho as the iron would melt the nylon before the glue melted. But here is a product I was looking at "Scotchlite" made my 3M that is a tape. I was going to put a band or two on each trekking pole as well as on my pack and Trekker. Amazon carries it and it isn't very expensive.

http://www.amazon.com/dp/B000BQRIV2/?tag=casaivar02-20

Laura
 
Laura:

You have all the right ideas. The trick is to integrate them to one, flexible, waterproof yet breathable, lightweight and safety colored design. If that design is NOT overly complicated, it might be producible in large quantities commercially. It COULD (as in might or maybe) be the perfect design.
 
Last edited:
I thought I would update this posting with how I thought the Ferrino Trekker that I had modified, performed on my Camino. I walked in rain 6 days. Some of the days were constant rain and others intermittent showers. Overall I was pleased with the modified trekker. My arms were quite comfortable with the wrists open and the pit zips open. But the big problem is sweating on your back under the backpack. There really is no ventilation in the trekker on the upper back. The front was fine because the chest vents can be opened up and you can moderate the ventilation additionally buy opening the zipper and just using the Velcro closures and keeping the zipper unzipped.
All that is needed is a ventilation fan to blow cool dry air in the space between the pack and your back. hah hah! ;) Another solution might be to to loose the backpack and go with a lumbar pack. Then add a back ventilation flap similar to a Columbia Tamiani shirt to ventilate the upper back.
Anyway it wasn't perfect but I do think the changes I made were for the best. I especially like the two front internal chest pockets I added which are accessed through the two front vents. That is where I kept my maps and water bottle.
Would I take the trekker on another Camino? Not sure, if I went in the summer and the weather was going to be warm then I'd be tempted to take an umbrella and maybe a small rain cape similar to what another forum member made to cover pack and shoulders. If I did another camino during cooler months then I'd go with the trekker.
Laura
 
Last edited:
Holoholo automatically captures your footpaths, places, photos, and journals.
I thought I would update this posting with how I thought the Ferrino Trekker that I had modified, performed on my Camino. I walked in rain 6 days. Some of the days were constant rain and others intermittent showers. Overall I was pleased with the modified trekker. My arms were quite comfortable with the wrists open and the pit zips open. But the big problem is sweating on your back under the backpack. There really is no ventilation in the trekker on the upper back. The front was fine because the chest vents can be opened up and you can moderate the ventilation additionally buy opening the zipper and just using the Velcro closures and keeping the zipper unzipped.
All that is needed is a ventilation fan to blow cool dry air in the space between the pack and your back. hah hah! ;) Another solution might be to to loose the backpack and go with a lumbar pack. Then add a back ventilation flap similar to a Columbia Tamiani shirt to ventilate the upper back.
Anyway it wasn't perfect but I do think the changes I made were for the best. I especially like the two front internal chest pockets I added which are accessed through the two front vents. That is where I kept my maps and water bottle.
Would I take the trekker on another Camino? Not sure, if I went in the summer and the weather was going to be warm then I'd be tempted to take an umbrella and maybe a small rain cape similar to what another forum member made to cover pack and shoulders. If I did another camino during cooler months then I'd go with the trekker.
Laura

Hi, Laura,
I am quite impressed with your sewing abilities! I also bought a Ferrino trekker and brought it with me on the Camino Levante two years ago. After one rainy morning I was sweating profusely and this was on flat land (actually, the inside of my poncho was wet almost immediately). This year as I was searching for help to get a replacement, a forum member pointed out that the Ferrino's metallic inside liner is there to provide warmth. Bingo. No wonder I was sweating so much. So I have returned to the simple ways of an unlined poncho and though I have been lucky not to have had much in the way of rain to test it out, I think that it's got to be better than the Ferrino.

I think you could consider a new career -- making an unlined poncho with sleeves and with all the improvements you've added. I would be happy to test it out for you on the camino next year. :)
 
I think the Ferrino Trekker design, with the pit zips, open wrists, improved chest vents, two way zipper up the front, and a back vent, made out of the super thin Sil- Nylon fabric that the Sea to Summit poncho is made from would be ideal. The Sil Nylon fabric is much lighter than the metalized nylon used on the Trekker. Although the Sil Nylon fabric being so thin is very fragile. My Sea to Summit daypack that I took on the camino came home with several small holes worn through the bottom of the pack. I tried to patch these holes on the Camino with duct tape, and band-aids, but the Sil Nylon surface repels everything and won't let anything stick to it. The duct tape would just fall off the pack. I will need to sew on a patch.

I don't see many posts concerning the effectiveness of goretex jackets. Do they really keep the rain out and let the sweat escape? Maybe a Trekker design made from Sil Nylon but with a upper back panel made from goretex would be effective?

My Camino rain gear was the most unsatisfactory item in my kit. I'm not sure there ever will be a really good solution for all types of rainy weather experienced on the Camino.
 
I have a Packa and one of the BEST features is that it can be attached to the pack and you just slip your arms in and out as the weather dictates. We just had a day on the Portuguese where it flapped around most of the day, but every half hour or so we had a good downpour for a few minutes. After a series of put-it-on-take-it-off the guys I was walking with ended up either a) just getting wet coz they couldn't be bothered getting their jackets out AGAIN or b) just getting wet from perspiration coz they couldn't be bothered taking theirs off AGAIN. I slipped my arms in and out all day long and was dry! So if you do go in to production, you might consider this feature - but beware of breaching any copyright!
 
The 2024 Camino guides will be coming out little by little. Here is a collection of the ones that are out so far.
Laura:

Sign me up for testing the XXL version when you start production. I like neon colors, with lime yellow being my all-time favorite.

A related problem with the Ferrino is that it is sold in two sizes if I recall correctly. The sizes were S/M and L/XL. The larger size just barely fit me. I joking referred to it as "Zippy, the full body condom" while on my 2013 Camino. It did the coverage job, but did not have much extra circulation space.

So, I recommend upsizing the pattern to US size standards. You might consider basing the sizing on height instead of girth. With such a raincoat, leg coverage is a factor.

You might base your sizing on the distance (or height) in cm or inches from the base of the neck in the back, to the rear of a knee joint. That is a good standard that is easy to understand. You can figure out the hood height and the extra 4 - 6 inches (10 - 15 cm) to add so the actual hem falls that much below the knee.

Your efforts on this project were awesome. I particularly appreciate the after-action report. In fact, nearly every post in this dialog was helpful and will contribute to a final "best" effort.

Oh, as regards earlier comments about Cuben fiber, it is far more expensive than any other fabric out there, including Gore Tex or Sil-Nylon.

As always, I hope this helps.
 
Tom,
Unfortunately I won't be going into production with the new design rain gear. I may be ambitious enough to make one for myself with the improvements if I do another camino where the weather is expected to be cold and rainy, including lighter non-metalized fabric, like the Sil Nylon with a goretex back panel/vent. I'm just hoping an equipment manufacturer will contact some of the people in this post for feedback before they design their new rain gear. We could significantly improve rain gear designed specifically for the camino.

I walked a number of days where my shoes were totally filled with water. Water would run down the trekker to my Macabi skirt which would cling to my legs then the water would run down my legs and drain into my shoes. Extra length might have helped but then I would have needed some gaiters to direct the water over my shoes. So there are more issues that need to be resolved. An umbrella is sounding better and better to me except when the rain is really coming down and the wind is blowing an umbrella won't be of any use either.

Rain gear - the most challenging piece of equipment in my kit.
 
You know, I think I have finally adopted the attitude I've heard from some hard core long distance hikers. They have told me that rain gear's purpose is not to keep you dry from the rain, it is to prevent hypothermia. Since I walk in spring/summer, that is not an issue for me. So I think I am ready, after 15 years of searching for the perfect solution, to just accept the fact that I will get wet, my feet will get wet, all the clothes I'm wearing will get wet. But I will take solace in knowing I have good protection for my pack, so that when I stop walking, getting dry will be easy to accomplish. I don't see that as accepting defeat, but rather as accepting the reality that no matter what, I will sweat inside my rain gear, and sweating makes me wet. :D
 
3rd Edition. More content, training & pack guides avoid common mistakes, bed bugs etc

❓How to ask a question

How to post a new question on the Camino Forum.

Most read last week in this forum

Am busy doing a spring clean/room tidy and having a look at my travel/camino clothes, took photos just for fun...for my next future travels. Missing the long sleeve merino, as am looking at an...
Looking for recommendations. I dislike sleeping bags. I’m also not fond of sleeping bag liners. I own one of each and carried them on all my Camino's but I don't think I ever once slept in them...
Hi there! A few months ago, whilst doing first aid training our instructor mentioned that there were personal, one-use AED defibrillators on the market suitable for carrying in a back-pack. I...
I will be doing the Camino Frances in May/June 2025. I’m trying to decide between Hoka Challengers and Merrill Accentors. The Challengers don’t seem to have a very robust sole as the middle part...
Hallo, First of all - thanks to all of you in this warm and generous community. Every time I have had a question, I've found a thread where someone else asked the same question years ago and it...
While shopping this morning I noticed that Aldi's ski clothing special buys will include merino base layers, and zip and roll neck tops. Due in store this Thursday. I bought a merino top from them...

Featured threads

❓How to ask a question

How to post a new question on the Camino Forum.

Featured threads

Forum Rules

Forum Rules

Camino Updates on YouTube

Camino Conversations

Most downloaded Resources

This site is run by Ivar at

in Santiago de Compostela.
This site participates in the Amazon Affiliate program, designed to provide a means for Ivar to earn fees by linking to Amazon
Official Camino Passport (Credential) | 2024 Camino Guides
Back
Back
Top