• Remove ads on the forum by becoming a donating member. More here.

Search 74,075 Camino Questions

Did I Break My Z-poles?

peregrina2000

Moderator
Staff member
I was able to do some walking in Galicia recently, and was happy to have my Black Diamond Z-poles with me. HOWEVER :(, at some point I messed one of them up. Hope I can explain this, but what I now see when one of my poles is collapsed is that one of the joints just shows a cord. That is, the blue rubber covering has disappeared, and I don't see the same mechanism as I see at other the joints of the pole.

If this makes sense, and if anyone has any great repair ideas (I'm hours from an REI or good outdoor store), let me know. Thanks, Buen camino, Laurie
 
Get a spanish phone number with Airalo. eSim, so no physical SIM card. Easy to use app to add more funds if needed.
Hi Lawrie,

Below is from a suppliers site which describes the pros and cons of the poles. Looks like you may just have lost the protective flexible tube ends cover from that section. It should be ok as long as the cord is intact. You may be able to get a replacement when you reach your next outdoor store.


'Speed Cone technology comes from BDS expertise in avalanche probe design—a key component of Z-Poles' stiffness and fast deployment. Simply grab the grip and the first shaft section, and pull them away from each other. The pole will snap into place and lock. Each Speed Cone guides a shaft section into place, and stiffens the joint when the pole is locked. Protective, flexible tube ends cover the pole’s Kevlar® centre cord when folded.'

Sean.
 
Thanks, Madidi,
I am not on the Camino now, I'm home chomping at the bit waiting to walk in six weeks. Yes, the protective flexible tube is not visible, but I am sure that it is in the mechanism somewhere. It is impossible to get the two sections to lock tightly without that tube, though, that's my problem.
 
The focus is on reducing the risk of failure through being well prepared. 2nd ed.
I recently bought a new pair of Z poles at REI -- my old pair got me well over 1000 miles and were pretty worn.

After using the new poles a few times, one of the poles collapsed and I could not get it back together -- sounds like the same problem you are having?

Thankfully the REI store is nearby. I took the poles, one of their 'experts' attempted to fix it, but the inner flexible part (not sure what to call it) had broken.

They exchanged my poles for a new pair, no questions asked.

Hope you have a good outcome with your poles.
 
I am not on the Camino now, I'm home chomping at the bit waiting to walk in six weeks. Yes, the protective flexible tube is not visible, but I am sure that it is in the mechanism somewhere. It is impossible to get the two sections to lock tightly without that tube, though, that's my problem.
I cannot comment on what impact losing the plastic sheath will have, but I might be able to help with the locking mechanism. On my wife's Distance FLZ, there is an adjustment mechanism between the middle and lower pole section. Normally when the poles as collapsed, only a centimetre or so of grey plastic is exposed. But if you seat the top and middle sections together, you will be able to pull the middle and bottom sections further apart. This exposes more of the adjuster, and it should be clear that one section is screwed into the other. Screwing the adjuster in or out will alter the overall length of the cord. It might be a bit of trial and error, but you should be able to shorten the cord a little at a time until you get the lock tighter.
 
Last edited:
I would suggest trying the adjustment that Doug describes.
Mine have become a little loose at times and I have been able to adjust.
It does take a bit of trial to get the ideal adjustment..but easy to do.
 
Train for your next Camino on California's Santa Catalina Island March 16-19
Thanks, Madidi,
I am not on the Camino now, I'm home chomping at the bit waiting to walk in six weeks. Yes, the protective flexible tube is not visible, but I am sure that it is in the mechanism somewhere. It is impossible to get the two sections to lock tightly without that tube, though, that's my problem.

I fixed this same problem for another pilgrim while on Camino last year, albeit temporarily. Use 2" wide duck tape to secure the two segments. You can remove the tape to collapse the poles, then apply fresh tape as needed.

It is not a perfect fix, but it got the pilgrim I helped the rest of the way to Santiago.

I was so enthralled with the Z-pole design that I obtained a pair later in the year. I will use them on Camino starting 27 April, from Lisbon (central route).

I hope this helps.

Thanks t2andreo, but I am going to try to get them repaired or in the worst case buy another pair. I don't think it's wise to start walking with broken poles. But I do always bring a lot of duct tape wrapped around my poles for emergencies, so I would try to do what you did if they broke on the camino. I have contacted Black Diamond, let's see what they say.

Hope you enjoy the central route from Lisbon. I was just out at the Alpriate albergue last week and they had already had almost 50 pilgrims since opening several weeks earlier. It was a little chilly, and the hospitaleros tell me that they are astonished at the numbers of (mainly US) pilgrims coming through with no sleeping bag.
 
There is no problem too big for duck tape! But, contacting the company is the smart way to go. I have had very good luck with Leki over the year. Also, the now-classic twist secure fittings used in most Leki poles can readily be fixed "in the field."

I am looking forward to my coming Camino. I do not cary a sleeping bag any more. I stay in hostals or hotels 90% of the time, and carry an Alps Engineering microfiber, full-zip rectangular bag liner. If I need more warmth, and no blankets are available, I wear my next days hiking outfit, plus my fleece jacket.

I hope you get your poles fixed. They are expensive to replace.
 
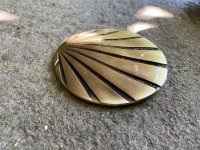
The one from Galicia (the round) and the one from Castilla & Leon. Individually numbered and made by the same people that make the ones you see on your walk.
So, this is what Black Diamond has told me:

Fixing this pole is quite easy. It takes less than 5 minutes.

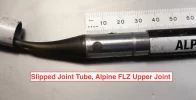
The problem on this pole is the joint piece has slipped up inside the next upper section. Using a flathead screwdriver, insert it into the stuck joint piece. Torque it against the sides and pull to draw it back out. Using a very small amount of epoxy, position it back into the correct place. Wipe away any excess and let it cure at room temperature. It should be good to go.

I will give it a try and then turn it over to someone more adept if I mess it up. But it does seem simple!
 
I cannot comment on what impact losing the plastic sheath will have, but I might be able to help with the locking mechanism. On my wife's Distance FLZ, there is an adjustment mechanism between the middle and lower pole section. Normally when the poles as collapsed, only a centimetre or so of grey plastic is exposed. But if you seat the top and middle sections together, you will be able to pull the middle and bottom sections further apart. This exposes more of the adjuster, and it should be clear that one section is screwed into the other. Screwing the adjuster in or our will alter the overall length of the cord. It might be a bit of trial and error, but you should be able to shorten the cord a little at a time until you get the lock tighter.

I had missed this comment, Doug, but it could very well explain how I had the problem in the first place. So if I can torque out the plastic part, I'll see if I can do what you suggest. Thanks!
 
Perfect memento/gift in a presentation box. Engraving available, 25 character max.
I cannot comment on what impact losing the plastic sheath will have, but I might be able to help with the locking mechanism. On my wife's Distance FLZ, there is an adjustment mechanism between the middle and lower pole section. Normally when the poles as collapsed, only a centimetre or so of grey plastic is exposed. But if you seat the top and middle sections together, you will be able to pull the middle and bottom sections further apart. This exposes more of the adjuster, and it should be clear that one section is screwed into the other. Screwing the adjuster in or our will alter the overall length of the cord. It might be a bit of trial and error, but you should be able to shorten the cord a little at a time until you get the lock tighter.

I just did this to my FLZ poles to get them "tuned up" in preparation for my coming Camino Portuguese from Lisbon on 27 April. The spring-loaded locking release button on the second upper tube section was not exposed and did not engage, on either pole. I wonder if this happened when I ran them through the dishwasher last summer after using them...hmmm?

I went online to read the instructions at Black Diamond. It turns out, as DougFitz pointed out above, that you can adjust the tension, and locking button position, by turning the grey plastic adjuster located between the first and second lower sections. Turning it clockwise increases the tension at the upper, locking button. turning the grey plastic thingie reduces the tension.

To access the adjuster, open the flip-lock at the upper section (the length adjuster). Then pull out the lowest section, you should see the grey adjusted. There is a bolt and an attached "nut." You turn the bolt head as I mentioned to increase or decrease the tension. I found that a plain pair of pliers helped hold one half.

This brought the little button lock, on the blue strip into view. Playing with the tension yielded a good, firm locking setting. I am happier now.

BTW, I am still checking these very expensive puppies in the hold. I will not take the chance that some over-zealous security person will confiscate them.

I hope this helps.
 
Hi Lawrie,

Below is from a suppliers site which describes the pros and cons of the poles. Looks like you may just have lost the protective flexible tube ends cover from that section. It should be ok as long as the cord is intact. You may be able to get a replacement when you reach your next outdoor store.


'Speed Cone technology comes from BDS expertise in avalanche probe design—a key component of Z-Poles' stiffness and fast deployment. Simply grab the grip and the first shaft section, and pull them away from each other. The pole will snap into place and lock. Each Speed Cone guides a shaft section into place, and stiffens the joint when the pole is locked. Protective, flexible tube ends cover the pole’s Kevlar® centre cord when folded.'

Sean.
Hi, I am thinking of buying these poles. Are they any good. I walk fast and work poles hard.
 
I have been using the carbon Z-poles since about 2010...never a problem and are still in excellent condition.
I do not have the adjustable style as I don't think that was an option at the time I bought my poles.
The fixed style is lighter.
 
Join the Camino cleanup. Logroño to Burgos May 2025 & Astorga to OCebreiro in June
Wow, I love this forum. My poles are fine, but I could not resist looking at the mechanism described by @dougfitz. I would never have known about it otherwise!
 
I was able to do some walking in Galicia recently, and was happy to have my Black Diamond Z-poles with me. HOWEVER :(, at some point I messed one of them up. Hope I can explain this, but what I now see when one of my poles is collapsed is that one of the joints just shows a cord. That is, the blue rubber covering has disappeared, and I don't see the same mechanism as I see at other the joints of the pole.

If this makes sense, and if anyone has any great repair ideas (I'm hours from an REI or good outdoor store), let me know. Thanks, Buen camino, Laurie

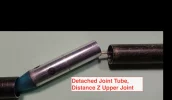
My wife and I have this problem with both pairs or our Z-Poles, her's came all the way out and mine are starting to. The problem and fix are what you were told by the manufacturer. This joint has disassembled itself and must be retrieved from the upper section it slid into and put back and glued into the lower section to function properly, it has nothing to do with cord tension adjustment or the snap button.

The Z-joint consists of a 50mm (~ 2in) long inner aluminum tube that the manufacturer inserted half way into the upper end of the section below the joint and glued in place, leaving the other half (25mm) sticking out - this is the shiny smaller diameter tube you see projecting from the lower section of a non-failed joint when the poles are folded. The flexible, rubbery sleeve that protects the cord from being cut by the sharp edges of the folded tubes is fixed in place in the upward facing end of the small tube and slides into the section above when the poles are assembled. The joint gets its lateral stiffness (resistance to bending) from the overlap of this inner joint tube with the two outer tubes, to do its job effectively it must be insert about equally into the tubes on either side of the joint.

With use the the glue holding this joint tube in place fails, allowing the joint tube to work itself out of the lower tube and, in both the poster's case as well as my wife's, it slid all the way up into the next higher section. Black Diamond suggests extracting it from the upper section using a small screwdriver, we managed it using the handle end of a metalworking file which generally have sharp edges that can grab the inside edge of the joint tube for twisting as one pulls.

Before gluing, clean the surfaces to be bonded with an oil-free solvent, rubbing alcohol or methanol should do, and you may want to rough up the bonding surfaces with medium emery paper followed by another alcohol wipe - many glues don't bond well to metals and benefit from some mechanical interlocking (it appears Black Diamond failed to do this). You want to both degrease the joint and remove traces of the original adhesive from both the joint tube and the lower section that it will be glued back into. It looked like the original adhesive on my wife's may have been a type of superglue - we used a thin bladed knife to scrape it out (the end of a file or any sharp tool should do), follow this with emery paper wrapped around a pencil or dowel, then an alcohol moistened cloth or cotton wrapped around a dowel.

You can try superglue, but a compliant (not brittle) structural adhesive may be a better choice for resisting the repetitive flexing these joints receive - my favorite is 3M's type 2216, ask around. The epoxy "JB-Weld" also should work. Thick epoxies generally can be thinned with alcohol but other types of glues may require different thinners. After the joint tube is back in place, wipe off any glue residue from the joint before it sets - an alcohol moistened rag will work for epoxies. To be on the safe side, wait for the glue to set before reassembling the pole.

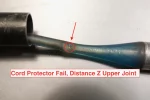
Another problem we've had is cutting of the protective sleeve by the tube edges. BD says these can't be replaced, but suggests that superglue, applied to a developing cut, may extend their life. Gluing on a patch of tough material (urethane rubber, leather, etc., or wrapping with cloth "friction tape" also may help. Inspection is your friend.
 

Attachments

  • DSC06951.webp
    DSC06951.webp
    340.6 KB · Views: 10
  • DSC06952.webp
    DSC06952.webp
    344.3 KB · Views: 10
  • DSC06955.webp
    DSC06955.webp
    345.4 KB · Views: 9
Last edited:
So hard to believe that three years ago I was worrying about my hiking poles. I do have a pair in my closet, @ken2116 and hope that I can use them enough in the next few years to wear them out and have to worry about fixing them again. Many thanks for your detailed instructions. Buen camino, Laurie
 
The focus is on reducing the risk of failure through being well prepared. 2nd ed.
Wow, I love this forum. My poles are fine, but I could not resist looking at the mechanism described by @dougfitz. I would never have known about it otherwise!

I’ve had to get my ‘never had a problem and was not aware of the potential for one’ Z-poles out and examine them closely.
It’s a bit like when someone has it explained to them how aircraft stay in the air through differential air-pressure around the shaped wing. You can see them grip the seat more tightly, even though nothing’s actually changed - they’ve just become better informed.
 
The focus is on reducing the risk of failure through being well prepared. 2nd ed.
Love a good thread about Z-poles!!! Even one that is a few years old!

Mine Z-poles are about 10 years old. The joint tube (original reason for this good thread!) is still fine -- but the rubbery cord protector thing is starting to break down. I fear that might mean the end of the poles at some point...but I'm hoping they will last for an upcoming walk in the UK and maybe another longer camino. Fingers crossed.

Related: My Z-poles were sold as "women's" in about 2013? 2014? Of course that meant they were purple (fine with me, but very predictable). They may also have been an in-between length (105-120). My partner just bought a new pair of Z-poles. The locking mechanism on the new poles is much easier to use! But the wrist straps are not as good as the old ones. The weight is about the same. Colour much more boring! (black with a bit of blue). It was also not hard to change the carbon tip to the rubber tip (but still required pliers).
 
Last edited:

❓How to ask a question

How to post a new question on the Camino Forum.

Most read last week in this forum

Am busy doing a spring clean/room tidy and having a look at my travel/camino clothes, took photos just for fun...for my next future travels. Missing the long sleeve merino, as am looking at an...
Looking for recommendations. I dislike sleeping bags. I’m also not fond of sleeping bag liners. I own one of each and carried them on all my Camino's but I don't think I ever once slept in them...
Hi there! A few months ago, whilst doing first aid training our instructor mentioned that there were personal, one-use AED defibrillators on the market suitable for carrying in a back-pack. I...
I will be doing the Camino Frances in May/June 2025. I’m trying to decide between Hoka Challengers and Merrill Accentors. The Challengers don’t seem to have a very robust sole as the middle part...
Hallo, First of all - thanks to all of you in this warm and generous community. Every time I have had a question, I've found a thread where someone else asked the same question years ago and it...
While shopping this morning I noticed that Aldi's ski clothing special buys will include merino base layers, and zip and roll neck tops. Due in store this Thursday. I bought a merino top from them...

Featured threads

❓How to ask a question

How to post a new question on the Camino Forum.

Featured threads

Forum Rules

Forum Rules

Camino Updates on YouTube

Camino Conversations

Most downloaded Resources

This site is run by Ivar at

in Santiago de Compostela.
This site participates in the Amazon Affiliate program, designed to provide a means for Ivar to earn fees by linking to Amazon
Official Camino Passport (Credential) | 2024 Camino Guides
Back
Back
Top